Android in the cloud for developers and testers: Redroid with GPU rendering
An Android device that is always on, reachable with ADB from your laptop or your CI, and that you can reset in seconds: that is what Redroid gives you on a Linux server. Redroid (“remote Android”) runs a full Android system in a Docker container, without a virtual machine inside the server. It is useful to test your app on a clean Android, to run automated UI tests (Appium, uiautomator, Espresso), or to keep an Android-only app running 24/7.
The question for this article is simple: what does the GPU change? Redroid can draw the screen with the server’s GPU (through Mesa) or with the CPU only (software rendering). We ran the same tests on the same server in both modes.
Results at a glance
- Simple apps are smooth either way: scrolling Android’s Settings ran at 60 fps with 1 slow frame out of about 1,045 in both modes. But software rendering used 4 times more CPU (17.3 % of the server instead of 4.2 %).
- Anything 3D needs the GPU: a raymarching shader ran at 58.4 fps on the GPU against 7.2 fps in software, and the SuperTuxKart game at 60 fps against 19 fps.
- The GPU frees the CPU: with the GPU, Android used under 5 % of the server’s CPU in every test. In software mode, 3D work took 95 to 98 % of the 4 vCPU, leaving nothing for your tests.
- Boot is not faster with the GPU: Android was ready in about 13 s in GPU mode and 7 s in software mode.
- iGPU Start is enough for one Android instance; choose iGPU Power to run several in parallel or to test 3D apps and games.
Test setup
| Item | Value |
|---|---|
| Server | Debian 13, Linux 7.3, Intel UHD 770 (shared GPU), 4 vCPU, 10 GB of RAM |
| Android | Redroid, official image redroid/redroid:14.0.0-latest (Android 14, x86_64), Docker 29.9 |
| Screen | 1080×1920 at 420 dpi, 60 Hz (games switch to 1920×1080 landscape) |
| GPU rendering | redroid_gpu_mode=host: Mesa 24.0.8, “Mesa Intel UHD Graphics 770”, OpenGL ES 3.2 |
| Software rendering | redroid_gpu_mode=guest: ANGLE on SwiftShader (CPU), OpenGL ES 3.1 |
| Apps | Android Settings, Shader Editor 2.36.3 and SuperTuxKart 1.4 (both open source, from F-Droid) |
| Measures | frame rate per layer from SurfaceFlinger (dumpsys SurfaceFlinger --timestats), jank from dumpsys gfxinfo, CPU of the whole server from /proc/stat |
| Viewing | scrcpy 5.0.1 (official release), adb exec-out screencap for screenshots |
Each measure lasted 10 to 20 seconds. CPU figures are a share of the whole server (4 vCPU = 100 %).
1. Everyday UI: smooth in both modes, but not at the same cost
We opened Android’s Settings and scrolled up and down 20 times with adb shell input swipe, then read
Android’s own frame report with adb shell dumpsys gfxinfo com.android.settings:
| Settings, 20 swipes | GPU | Software |
|---|---|---|
| Frames drawn | 1,045 | 1,047 |
| Janky frames | 1 (0.10 %) | 1 (0.10 %) |
| Frame time, 50th / 90th / 99th percentile | 17 / 18 / 18 ms | 17 / 17 / 18 ms |
| Server CPU | 4.2 % | 17.3 % |
For a normal app with lists, buttons and text, the CPU of a modern server is fast enough to draw the screen by itself. The difference is the price: software rendering made the whole server about four times busier. When your tests run several instances or record the screen, that CPU is missing elsewhere.
2. 3D: where the GPU makes the difference
We used two open-source apps from F-Droid: Shader Editor, which draws a GLSL shader full screen and shows its frame rate, and SuperTuxKart, a 3D kart racing game. In Shader Editor we ran the default shader (very light) and a raymarching scene (spheres, soft shadows, fog) that we wrote for this test.
| Frames per second (CPU of the server) | GPU | Software |
|---|---|---|
| Shader Editor, default shader | 60.0 fps (4.0 %) | 60.1 fps (64.4 %) |
| Shader Editor, raymarching shader | 58.4 fps (1.8 %) | 7.2 fps (98.1 %) |
| SuperTuxKart tutorial, 1920×1080 | 60.0 fps (4.7 %) | 19.2 fps (95.2 %) |
| SuperTuxKart while driving, recorded by scrcpy | 59.2 fps | 16.1 fps |
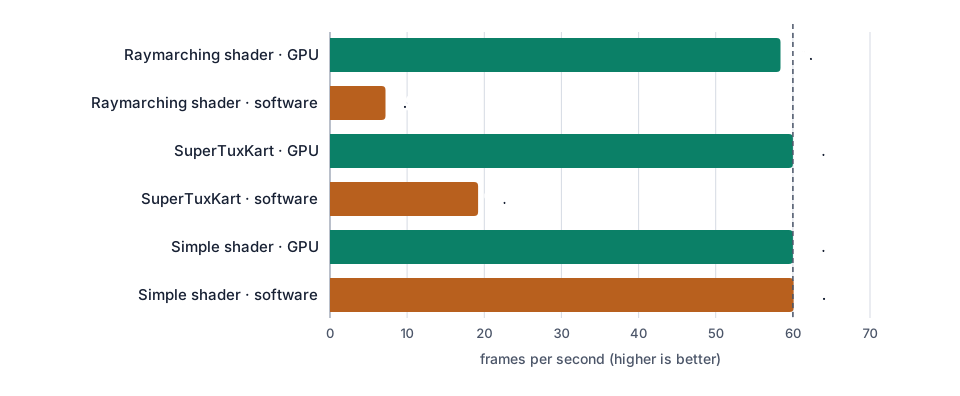
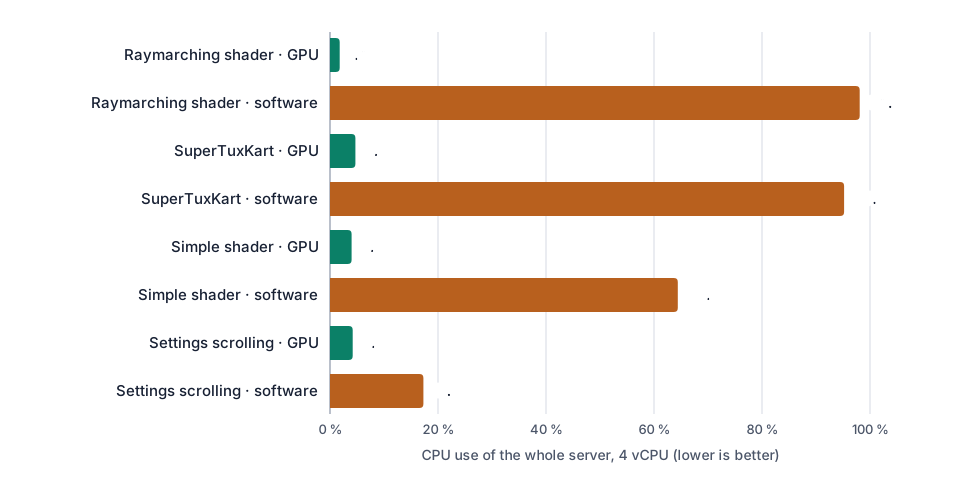
With the GPU, the 3D scenes stay at the screen’s 60 fps and the CPU is almost idle. In software mode the four vCPU are full and the frame rate falls to 7 to 19 fps: a game is no longer playable, and a UI test running at the same time would be slowed down too. While a game was running, the Redroid container used about 1.4 GB of RAM in both modes, and Docker counted 10 % of one core with the GPU against 381 % (almost four cores) in software mode.
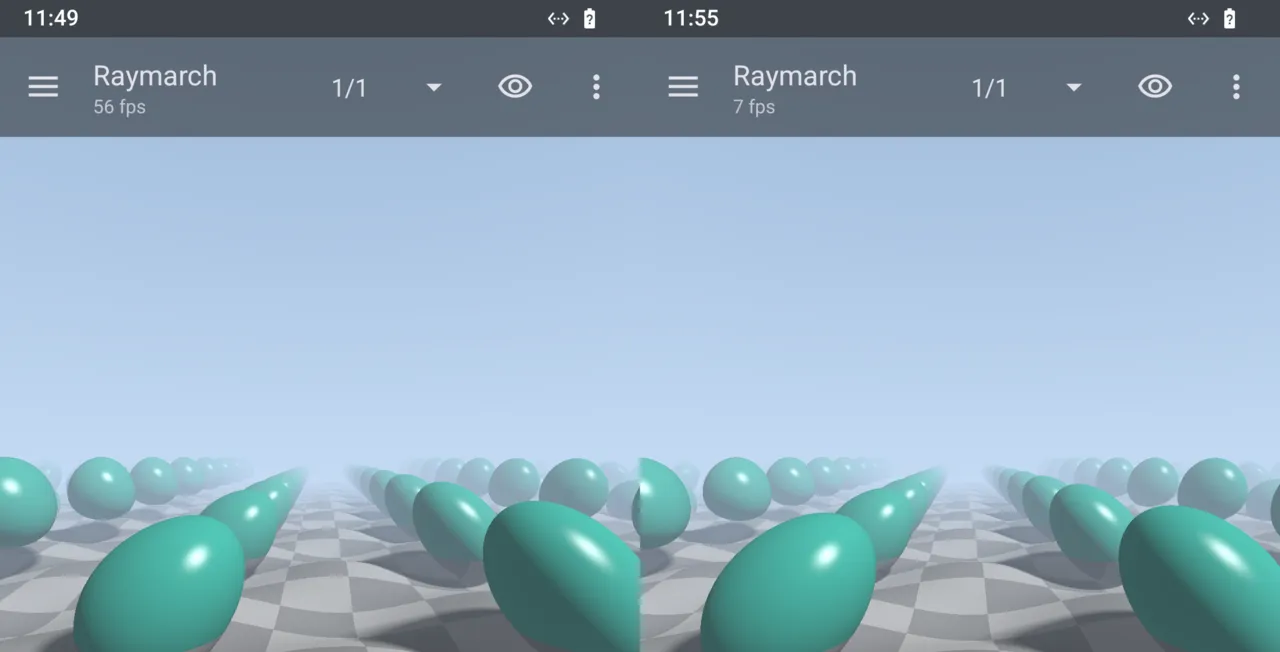
adb exec-out screencap: GPU on the left (the app shows 56 fps), software on the right (7 fps). The image is identical, only the speed changes.3. Boot time
We timed docker run until Android reported sys.boot_completed=1, three times per mode, with an empty
data folder each time:
| Boot to “ready” | Run 1 | Run 2 | Run 3 |
|---|---|---|---|
| GPU | 12.7 s | 13.3 s | 12.8 s |
| Software | 7.0 s | 6.5 s | 7.0 s |
GPU mode starts about 6 seconds slower, because the graphics driver is loaded and set up at boot. For a CI
job that starts a fresh Android for each run, count about 13 seconds before adb can install your app.
4. Viewing and controlling Android from your computer
Redroid has no screen of its own: you use it like a phone plugged in with a USB cable, through ADB.
- Screenshots:
adb exec-out screencap -p > screen.png, the method we used for the images above. - Live screen, mouse and keyboard: scrcpy (open source, by Genymobile) shows the Android screen in a
window and sends your clicks and keys. It works through ADB, so it works with Redroid. On the server we used
it without a window to record the videos of this article:
scrcpy -s 127.0.0.1:5555 --no-window --no-audio --record=run.mp4 --time-limit=7. - UI automation:
adb shell input(taps, swipes, text) drove every test of this article, andadb shell uiautomator dumpreturns the screen’s view tree. Appium (UiAutomator2 driver), Espresso and Maestro connect to an ADB device in the same way; we did not run them in this test.
Never open the ADB port to the Internet: Redroid’s ADB has no password and gives full control of the
Android system. We publish it on the server’s local address only (-p 127.0.0.1:5555:5555) and reach it
through an SSH tunnel:
# on your computer
ssh -N -L 5555:127.0.0.1:5555 you@<server> &
adb connect 127.0.0.1:5555
scrcpy -s 127.0.0.1:5555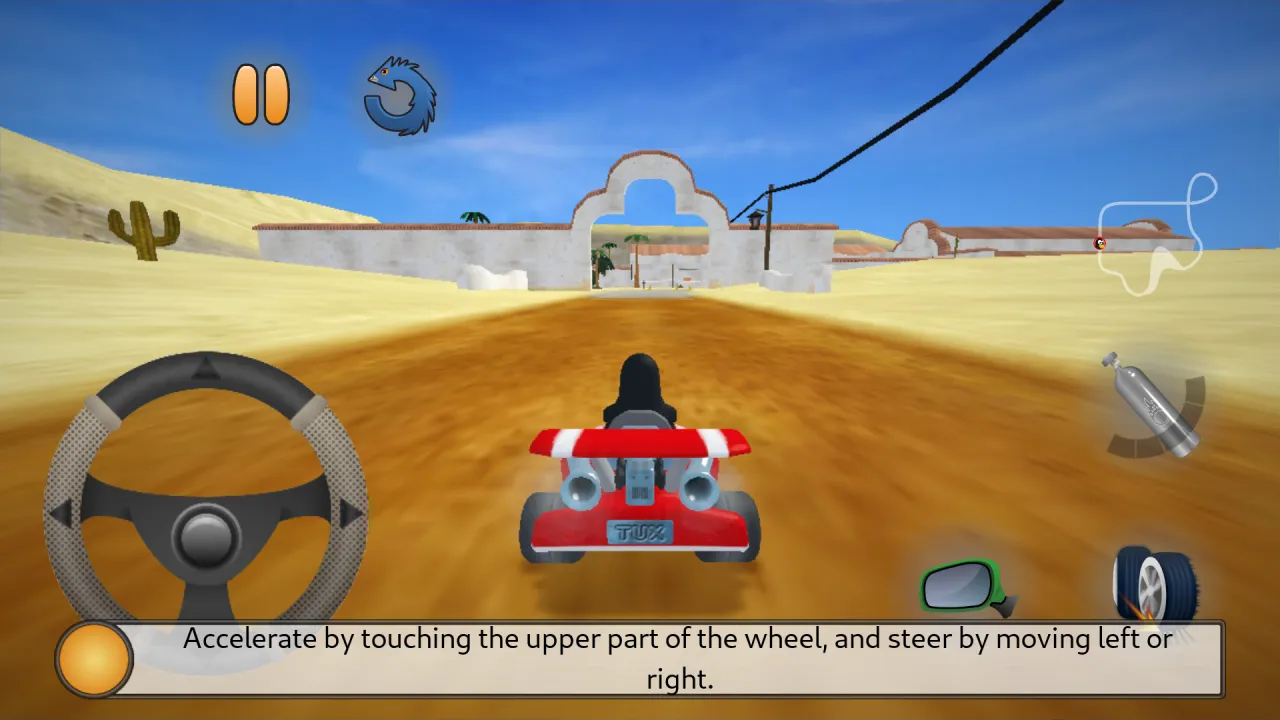
5. What to know before you start
- This is x86_64 Android. Apps written in Java or Kotlin run as they are. Apps and games with native code
built only for ARM (many games) need a translation layer: the Redroid image announces ARM support
(
arm64-v8a) through such a layer, but we did not test ARM-only apps, and they will be slower and may fail. - No Google Play Store. The official image has no Google services. Install your own APKs with
adb install, or open-source apps from F-Droid as we did. Apps that need Google Play services will not work as they are. - For testing and automation, not for faking phones. Redroid tells apps it is a virtual device. It is meant for development, testing and running your own tools, not to run many “phones” for multiple accounts, which most app terms forbid.
- No camera, GPS or SIM. Sensors are missing or simulated; test them on a real device.
6. Which plan?
With the GPU, one Android instance used under 5 % of our 4 vCPU and about 1.4 GB of RAM, even in a 3D game. iGPU Start (2 vCPU, 8 GB of RAM, €14.99 per month excl. VAT) is enough for one Android instance with your test tools next to it. iGPU Power (4 vCPU, 14 GB of RAM, twice the GPU share of Start, €29.99 per month excl. VAT) is the better choice to run several Android instances in parallel (one per test job), to test 3D apps and games, or to record the screen during tests. iGPU Pro (6 vCPU, 14 GB, Perf 3, €44.99) adds more GPU and CPU for larger test farms.
Without a GPU, the same server would have to give its whole CPU to drawing as soon as an app uses 3D.
7. Set it up on a Linux GPU server
Want it ready to use? Ask for it by email when you order (contact@linuxgpu.eu): we can deliver the server with Redroid already installed and set up for GPU rendering. You only connect with ADB through SSH and install your app.
To do it yourself on Debian 13:
-
Load Android’s binder driver (part of the Debian kernel) and keep it at boot:
echo "options binder_linux devices=binder,hwbinder,vndbinder" > /etc/modprobe.d/binder.conf echo binder_linux > /etc/modules-load.d/binder.conf modprobe binder_linux -
Install Docker and ADB (
apt install docker.io adb), then start Redroid with GPU rendering:docker run -d --name redroid --privileged \ -v ~/redroid-data:/data -p 127.0.0.1:5555:5555 \ redroid/redroid:14.0.0-latest \ androidboot.redroid_gpu_mode=host \ androidboot.redroid_gpu_node=/dev/dri/renderD128 \ androidboot.redroid_width=1080 androidboot.redroid_height=1920 \ androidboot.redroid_dpi=420 androidboot.redroid_fps=60 -
Check that Android uses the GPU:
adb connect 127.0.0.1:5555 && adb shell dumpsys SurfaceFlinger | grep GLESshould show “Mesa Intel(R) UHD Graphics 770”. “SwiftShader” means software rendering. -
Connect from your computer through the SSH tunnel above, install your APK with
adb install, and start your tests.
To reset Android to a clean state, remove the container and its data folder and start it again.
For browser tests on the same kind of server, read GPU-accelerated Selenium and Playwright tests and Chrome with GPU on a headless Linux server. To understand how a container uses the GPU of a virtual machine, see GPU cloud: VM or container, dedicated or shared GPU.
Try it
See the plans: iGPU Start is €14.99 and iGPU Power €29.99 per month excl. VAT.